This pandemic situation feels kind of like the final test for all the stuff we’ve been talking about: understanding exponential growth, capping the risk of ruin, being a frugal little cockroach, practicing stoicism for the shitty events outside of our control.
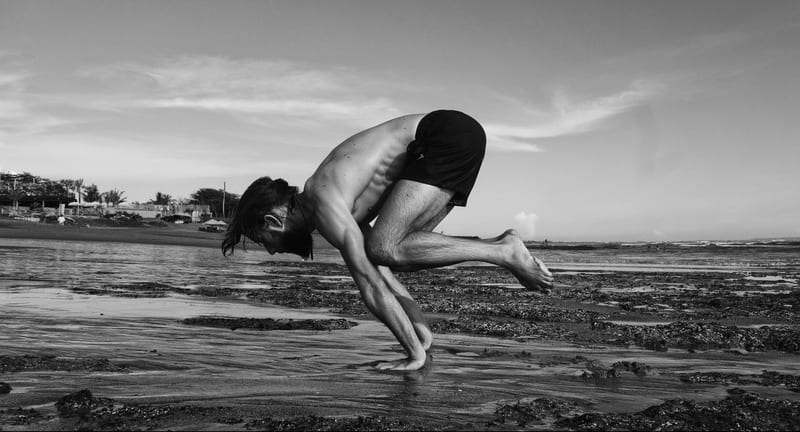
Of all the strange convergences, one of the most unexpected is that practicing calisthenics (bodyweight fitness) is really coming into its own.
Lots of gym bros are trapped at home with no way to work out. I feel you, bros and lady-bros! Some might call it a first-world problem, but regular training is one of the cornerstones to my mental health—not only whatever biochemistry magic is going on, but the psychological importance of maintaining a sense of agency and control. No matter how volatile life gets, two hundred pounds is always two hundred pounds.1
Thankfully, bodyweight training is universally available to anyone in possession of a body. And it’s not even a downgrade! Calisthenics is—in my totally unbiased opinion—the king of all exercises.
This ancient artform has been practiced and refined by soldiers and athletes for thousands of years. It builds a foundation of strength, kinesthetic awareness, and mobility that carries over to any other physical activity: fighting, climbing, lifting, sex, dancing, sports, yoga, gymnastics.
It costs next to nothing, gives a maximum of results with a minimum of time and effort, and crucially to our current situation, is about as minimalist as it gets.
While shinier fitness trends came along and distracted us, there’s one place that calisthenics has never gone out of fashion: in prison.2
Personally, I intend to come out of quarantine as jacked and strong as a jailbird, and maybe even with a newfound talent for making moonshine out of hand sanitizer.
If you want to give it a try, I’m going to run through how to bodge your own equipment, some popular misconceptions, a simple routine for beginners, demonstrations of all the main exercises, and finish up with recommended resources.
Table of Contents
Open Table of Contents
- Equipment
- Only Psychopaths do 1000 Crunches Before Breakfast
- The Big Six Movements
- Handstand Progression (Vertical push)
- Pullup Progression (Vertical pull)
- Dip Progression (Horizontal push A)
- Pushup Progression (Horizontal push B)
- Row Progression (Horizontal pull)
- Pistol Progression (Squat or hinge)
- L-sit Progression (Core A)
- Dragon Flag Progression (Core B)
- Putting it all Together
- Stray Thoughts
- Recommended Resources
Equipment
The bare basic requirements are ‘walls and a floor’. If you exist in some kind of 2-dimensional hellscape, calisthenics is not for you.
Everyone else is good though. And assuming your house contains a bunch of other junk, like ‘chairs’ and ‘doors’, you have even more options.
Again, I feel like this is my time to shine. My first barbell was a bamboo pole with buckets nailed to each end. I still love training with rustic equipment and found objects, even though I am no longer poor. In that spirit, let’s improvise.
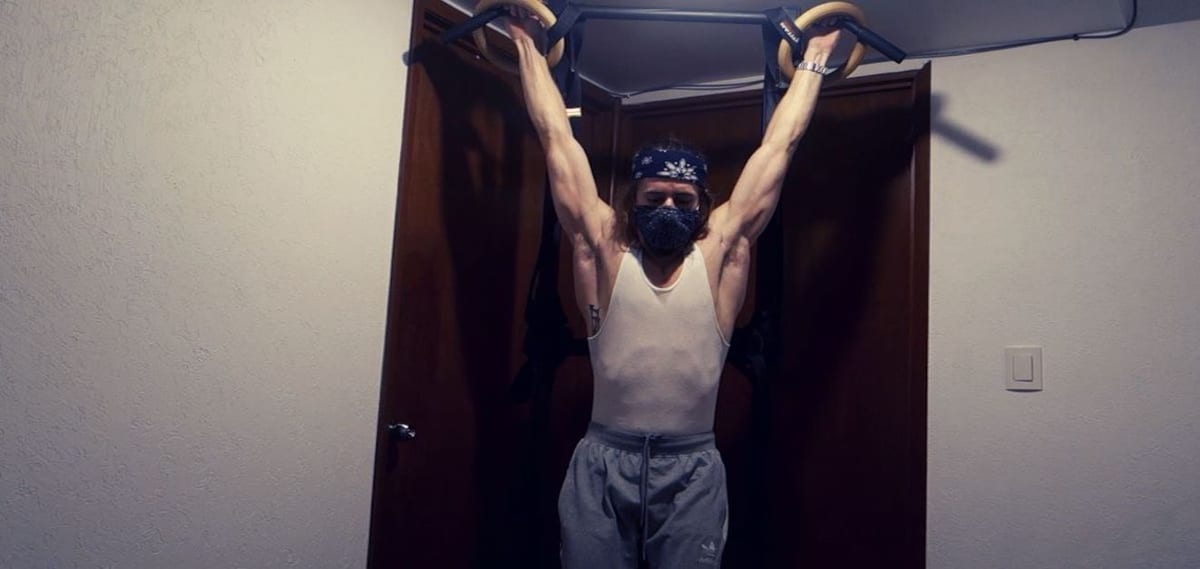
Improvising a pullup bar
This is the one piece of equipment that really does represent a big improvement over your basics ‘walls and floor’ setup.
Let’s start with the fantasy situation: gymnastic rings. Rings make everything harder—the first time you use them, you’ll be wobbling more than the economy—but ultimately, it’s for the best. Rings give a fuller range of motion, use more stabilising muscles, and improve joint health. So, if you have somewhere to hang them, and a spare ~$40, rings are the tippy-top.3
Next best: a pullup bar. Freestanding or bolted to the ceiling is best, followed by the ones that fit over a doorway lintel, but the cheap and cheerful ones that stick in the frame with friction alone are fine. If your country is not yet in lockdown, beat the rush on home workout equipment and grab one now. It’ll be the best $20 you ever spend.
Failing that: do you have a tree in your yard with sturdy branches? A doorway with a lintel wide enough to grip? Open stairs? An exposed beam or rafter? Congrats! You too have a pullup bar.
Failing that: if there’s literally nothing at head-height you can grab onto, you can just do a bunch more horizontal rowing-style movements instead.
Improvising weights
This is unnecessary—calisthenics is all about making exercises harder by changing the leverage—but let’s keep the imagination juices flowing a moment longer.
The ideal situation: a resistance band. You can use it to warm up and stretch. You can stand on it to make squats harder. You can anchor it to something sturdy for pushdowns, curls, face pulls, rows, etc. You can use it for assisted pullups.4
The low-tech solution: a backpack with heavy stuff in it. I’ve used plastic icecream containers filled with sand, but books work, or packets of flour, or whatever you have to hand.
Finally: a bottle of water with a handle, or one of those giant four gallon jugs, can be used to replicate all sorts of weightlifting moves. That’s not the focus of this post, but it’s an idea for those who prefer lifting.
In conclusion: if you can bodge some kind of pullup bar, and some form of resistance, great! But again…if you have literally nothing, that’s fine too.
Only Psychopaths do 1000 Crunches Before Breakfast
The popular conception of calisthenics is that it has something to do with cranking out a thousand crunches before breakfast, or taking the ‘100 Pushups Challenge!’
This is cringe, and it needs to stop. Does anyone think it’d be cool to do the ‘100 Reps of Benching the Empty Bar!’ challenge?
For whatever reason, bodyweight stuff gets a pass for all kinds of happy horseshit that no-one would consider doing with weights.
The main mistake is mixing up cardio and strength—which ought to be cleanly delineated—into a big old slurry of mediocrity. You’re stuck in the dreaded middle, cranking out a bunch of pointless and boring reps, and achieving the worst of both worlds.5
Sure, Patrick Bateman got pretty jacked from his obsessive morning routine:

“In the morning, if my face is a little puffy, I’ll put on an ice pack while doing stomach crunches. I can do a thousand now.”
…but it’s generally a bad idea to take advice from psychopaths. In real life, Christian Bale got in shape for the part through—you guessed it—a combination of cardio + heavy strength training.
Unfortunately, a lot of people working out at home will be doing whatever ‘killer ab blaster circuit!!!’ they happen to see on Instagram or YouTube that day, and keeping their muscles in a state of permanent confusion.
Before we go any further, let’s invoke the first commandment of exercise programming:
THOU SHALT exercise in whatever fashion thou enjoyeth enough to actually do.
Anything is better than nothing. You get your sweat on, the endorphins are flowing, you might even see some very modest results. If those are your goals, that’s fine! You can stop reading this post and go do your thing.
But just to be clear, this kind of thing has nothing to do with calisthenics. It’s flailing about randomly. If you want to get progressively stronger and build some muscles, the ‘scientific’ seven minute workout isn’t gonna cut it.
Real calisthenics is structured strength training.
The clue is right there in the name: kallos + sthenos, from the ancient Greek for ‘beauty’ and ‘strength’. Just like weightlifting, you’re moving through space against resistance. The only difference is that instead of using lumps of iron to provide the resistance, you’re using lumps of your own flesh.
Just like weightlifting, you work mostly in the strength and hypertrophy (muscle-building) range of intensity. That means a few hard sets per exercise, and 5-15 reps per set. When you get towards the top end of that range, you increase the resistance and start over.6
Instead of adjusting the weight of the barbell, you adjust the positioning and leverage of your body.
Which brings us to the next section: what are the main movements, and how can we progress through them?
The Big Six Movements
Every good strength routine—weights, calisthenics, whatever—is based around six patterns of movement:
- Vertical ‘push’
- Vertical ‘pull’
- Horizontal ‘push’
- Horizontal ‘pull’
- Squat or hip hinge
- Core flexion
You can add isometrics, hand balancing, mobility, various skills, but these six movements are the meat and potatoes.
I’m going to demonstrate a series of progressively harder exercises for each of these movement patterns. Where there are two options, you can pick whichever you prefer.
Caveat: I haven’t done some of these exercises in months or years, and I got pretty tired towards the end of filming, which means my form is a long way from perfect. Before you start each exercise, you’ll want to watch some expert tutorials on correct technique, tips and cues, etc.
Handstand Progression (Vertical push)
Order: Handstands and other types of balancing are skill work, so do them at the start of your workout while you’re fresh.
Mobility: Take this test for shoulder mobility. If you fail, you’ll need to do some stretching to open up your shoulders before you can get a nice line. Also, warm up your wrists and fingers before doing any handbalancing. Something like this.
Supplementary movements: It takes a fair bit of strength before you can start doing the actual pressing motion. The earlier progressions are isometric (static holds). They’ll still fry your shoulders, but if you happen to have a barbell or dumbells, you should totally throw in some overhead presses.
What next: If you can do freestanding handstand pushups, you’re a badass and you don’t need my advice, but parallettes will add a fuller range of motion.
Pullup Progression (Vertical pull)
Getting started: Besides starting at the top and lowering yourself down slowly, the other way to work up to a full pullup is to loop a resistance band over the bar for assistance.
Intermediate steps: I forgot to film L-sit pullups, which are a good intermediate step before muscle-ups.
What next: Add weight to any of the above, or switch to rings, or start working on the elusive one-armed pullup (dumb IMO but to each their own).
Dip Progression (Horizontal push A)
There are two horizontal ‘push’ progressions to choose from. If you’re able to improvise a dip station—i.e. you have two sturdy chairs—I’d do the dip progression. It’s especially good for building pressing strength when you’re in the early stages of handstands.
If you don’t have anywhere to do dips, or they’re too hard for now, then pushups are your friend.
Don’t do: Bench dips. They don’t have much carry over, and they’re bad for your shoulders. If you’re not strong enough to do negative dips, do the pushup progression instead.
What next: Add weight to any of the above, and/or switch to rings.
Pushup Progression (Horizontal push B)
Don’t do: Knee pushups. It breaks the bodyline and doesn’t train the movement pattern. Do the wall pushups in the video instead, and keep working your way down towards the ground.
What next: Add weight to any of the above, or elevate your hands and feet to increase the range of motion. If you’re doing pseudo-planche, keep moving your hands back. Or start working on one-armed pushups.
Row Progression (Horizontal pull)
Improvised rows: You can use a sturdy tabletop. You can use a knotted bedsheet over a closed door, like in the video. You can use a resistance band looped over something. If you have a heavy object (jug, rucksack) you can do a weightlifting-style dumbell row instead. Here’s a bunch of other bogan ideas.
What next: Add weight to any of the above (a backpack with some heavy stuff in it), or switch to rings.
Pistol Progression (Squat or hinge)
Mobility: If you can’t squat all the way down, you’re going to need to start doing a lot of stretches for whatever’s limiting you: ankle mobility, knees, hip flexors. You can also wear work boots/dress shoes, or slip something under your heel to get better depth.
What next: OK. Let’s be honest. There’s a reason calisthenics athletes love going shirtless but never take off their baggy pants. You can get a decent lower body workout with pistols and split squats and various hacky hamstring movements, but if you have access to a barbell…I would definitely just use that instead. Deadlifts and squats are unbeatable.
Assuming you don’t have a barbell, either use a resistance band, or improvise some weights. If that’s impossible too, just rack up a shitload of volume. You can still build pretty great pins by the standards of anyone except a weightlifter or track cyclist.
L-sit Progression (Core A)
There are two progressions here. Choose whichever seems cooler, or do both (your core can take an almost unlimited amount of punishment).
Floor is best: I’m using parallettes that I made out of PVC pipe: they’re light, strong, and disassemble for travel. But you’re actually much better off starting on the floor.
Mobility: This was really hard because I haven’t done any mobility work lately—it’s as much about hips and hamstrings as abdominal muscles. You’ll want to do some pike compression stuff like this, and hip flexor stretches like this.
What next: An L-sit is at a 90° angle. Keep closing the angle until you get to a 45° ‘V-sit’, then until you’re folded in half (0°). After that, you’re in the legendary sniffing-your own crotch territory of the manna.
Dragon Flag Progression (Core B)
Intermediate steps: I skipped some progressions because I was gassed. Whether you’re hanging or lying, in ascending order of difficulty: fully tucked knees → bent knees → one leg straightened → both legs straddled → both legs straight and together. You can also do negatives of any of these (use momentum to get to the top, then slowly lower yourself down).
Flat back: With the hanging variations, the key is to keep your back as upright as possible, and try not to swing around. Stall bars are ideal to prevent cheating, but you can also ask a friend to stabilise you.
Supplementary exercises: Isometrics are your friend. Especially hollow body holds (also teaches correct position for handstands and levers), planks, and side planks. Ab wheel frickin’ rules, and can be improvised with a dumbell.
Putting it all Together
You don’t need to separate your sessions into leg day or arm day or whatever. Full body is much more efficient, plus you can save time by alternating sets from each opposing muscle group (‘supersetting’).
The simplest template is to just do whatever progression you’ve reached on all six movements:
WORKOUT A
- Handstand progression
- Pullup progression
- Dip or pushup progression
- Row progression
- Squat progression
- Dragon flag or L-sit progression
That’s pretty thorough, so you only need to do it two or three times a week. Once you get stronger, this will become pretty taxing, and take a long time to work through.
Here’s another template that alternates between a couple of shorter workouts:
WORKOUT A
- Handstand progression
- Pullup progression
- Dip or pushup progression
- Dragon flag progression
WORKOUT B
- Handstand progression
- Squat progression
- Row progression
- L-sit progression
I’d try and shoot for getting in 3-4 of these a week. For a sense of how it might look in practice, here’s my current routine:

None of this is set in stone. Customise it however you want, and do more of whatever you find fun. Once again, even a mediocre program that you actually enjoy beats the pants off a perfect program that’s too boring or hard to stick with.
Stray Thoughts
Levers
What about the gymnastic levers (back lever, front lever, human flag, planche)? They’re cool as heck, but I’m not going to include them here—they’re all skill-based, they’re isometric holds, they’re harder on your tendons, and you train them a bit differently/more cautiously. You can absolutely start working on them from the start if you want, but that’s outside the scope of this post—see the recommended resources.
Muscle soreness
You’re going to be sore to begin with (DOMS). I kind of like this feeling, but if you don’t, fear not: it will pass as you get used to the movements. Remember that muscle soreness is not the goal! In fact, constant soreness is a signal that you might be flailing about randomly.
Progression gaps
Sometimes these progressions need extra intermediate steps. Once you understand the principles of the movement, you can bridge the gap by adjusting the leverage to be somewhere in the middle—one leg or one arm variations, elevated feet or hands, changing the angle of your body relative to the plane.
You can also add or remove resistance: a weighted backpack, or resistance band-assisted variations.
Proprioception
If some of this stuff looks hard, bear in mind that I have all the proprioception of a baby giraffe. Developing a sense of how your body moves through space takes time, although you can accelerate this process by recording yourself with your phone. The added benefit is that if you bail in amusing fashion, you’ve got it on film for posterity.
Mobility
This is going to halt your progress at some point, if not immediately on certain exercises (e.g. squats). It’s really important, and also the biggest advantage over weightlifting, where you’re incentivised to move through the smallest possible range of motion. It’s impossible to cover every potential issue in a blog post, so you’ll have to google any specific problem that comes up, or check out the recommended resources below.
Recommended Resources
This post should be enough to get started right now. But you can and should keep learning, which means seeking out people who are way more experienced than me.
Reddit Bodyweightfitness
No kidding. An online community that hasn’t degenerated into a festering pool of toxicity! This is possibly related to their rule number 4: “don’t be a fucknugget”.
This subreddit is a goldmine. The regulars are helpful, there’s an extensive wiki, and you can use the search function to answer almost any beginner’s question.
They also have a Recommended Routine that incorporates the levers and a ton more mobility practice, if you’re interested. I’ve personally never used it, because it’s so thorough as to be boring, but it’s obviously another solid place to start.
See also: r/flexibility, which is the same idea for all things mobility related.
YouTube
This is definitely an area where visual learning is ideal, and there are a bazillion YouTube channels for calisthenics. I like FitnessFAQs and Antranik, although I don’t follow any accounts closely—I usually just look things up when I have a specific problem to solve.
Overcoming Gravity — Steven Low

If you want to start doing your own programming, this is the textbook for you. And it really is a textbook! I can’t in good conscience recommend it to beginners, because it’s gonna be a confusing slog, but it’s basically the calisthenics bible. The author is a regular on the aforementioned subreddit, so you can also ask him follow-up questions there.
Convict Conditioning — Paul Wade

This book is written by a grade-A bullshit artist. Paul “Coach” Wade is not a real person. His made-up criminal backstory is cringeworthy in the extreme, although unintentionally kind of funny.
The programming advice is also terrible, and should be ignored. The reason I recommend it is that this is what got me hooked on calisthenics, and the progressions themselves are great, especially for someone without previous training. The book outlines 10 steps of increasing difficulty for each the big six movements, with illustrations, and easy to understand descriptions.
Notes:
Footnotes
-
From this cheesy-but-awesome Henry Rollins quote: “The Iron never lies to you. You can walk outside and listen to all kinds of talk, get told that you’re a god or a total bastard. The Iron will always kick you the real deal. The Iron is the great reference point, the all-knowing perspective giver. Always there like a beacon in the pitch black. I have found the Iron to be my greatest friend. It never freaks out on me, never runs. Friends may come and go. But two hundred pounds is always two hundred pounds.” ↩
-
Contrary to what you see in the movies, most prisons and jails don’t have yards full of weights. A bunch of dumbass ‘tough on crime’ types campaigned to get rid of them 30 years ago, so prisoners went back to doing improvised calisthenics workouts. ↩
-
As a general rule, you want wood over plastic, thick over thin (1.1” are for competition or people with really small hands), and heavy-duty straps with plenty of redundancy, since you’re gonna be dangling from them head-first over the ground. The Titan rings I travel with aren’t in stock right now, but these ones look good. ↩
-
Again, I was lucky enough to already have this in my portable gym. I travel with a green band, which is mid-strength. If you think you’re substantially weaker or stronger than me, you should go for the one below (usually yellow or red) or above (usually blue or black). If you want to push the boat out, you could get two colours. ↩
-
The deck of cards workout, which I sometimes do when I’m pressed for time, pushes right up against this line. It’s great for general conditioning and for fun, but it’s not a replacement for structured training. ↩
-
This is the simplest version of periodisation, and the idea is to keep milking it for as long as you possibly can. You’ll eventually have to take a more cyclical approach, but that’s not something to worry about for many months or years. ↩


23 Comments
Comments are archived from the original site. To respond, get in touch via the contact page.
Show 1 reply Hide reply
Show 1 reply Hide reply
Show 1 reply Hide reply
Show 1 reply Hide reply
Show 1 reply Hide reply
Show 1 reply Hide reply
Show 1 reply Hide reply
Show 1 reply Hide reply
Show 1 reply Hide reply